Great Eyes in Lightroom
“Here I am!”
Anyone who has played peekaboo with their kid will probably recognize the above exchange. It’s been seven months since I last updated the blog (Why do I feel like I’m going into a confession booth or something?) and the picture here should explain why. That’s my son, John, born May 7th, 2009. With the new addition to the household has come a big change in my photographic focus. I barely ever have a lens other than the Canon EF 50mm/1.8 on anymore. It’s just the right focal length for portraits of my little guy and I can take indoor shots at ISO 1600 at f/1.8 with a nice shallow depth of field. I have also been playing around with off camera lighting a lot recently. Most of the time I keep one flash on a stand with an umbrella ready to go and one bare. I’ve gotten pretty decent at guessing the right settings to use to get the effect I want. This shot of my son with his Turtle Truck (and his tongue hanging out) is an example where I just grabbed two flashes and started playing. You can see from the catch-lights in his eyes that I have two strobes set up, one small (or far away) and one larger (or closer). In this case, it was a shoot-through umbrella camera right and a bare strobe camera left for fill.
 But this post isn’t about lighting. It’s about Lightroom. With the thousands of pictures I’ve taken of my son, I’ve managed to figure out a few quick and dirty tricks to edit these pictures fairly quickly. Since the eyes are the window to the soul, it is critical that they “pop.” Most of my editing involves getting the eyes to look great without looking unnatural. Of course, the process begins when you are taking the shot ‘ put that focus point right on the eye nearest to you. If you didn’t get the focus right on the eyes in your original exposure, no amount of post-processing will help and you might as well just try again. Note, this is easier said than done with a 6 month old who is learning to crawl and thinks that the big box in front of Daddy’s face is oh so interesting.
After adjusting exposure and getting rid of any obvious blemishes with the healing tool, I do a few things:
- Soften skin by lowering Clarity to approximately -15. Clarity adjusts the edge contrast and lowering it has the effect of softening skin. Raising it brings out the blemishes.
-
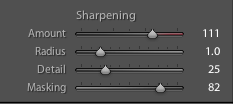
Add a sharpen mask ‘ I zoom in on the eyes then hold down the Option key (Mac) and drag the Masking slider around until the skin texture isn’t being affected and only the eyes are showing with white lines in them. Holding down the option key shows you a gray-scale version of the sharpening mask being used ‘ light areas will be sharpened and dark areas will not. Masking basically sets the threshold for when sharpening will be applied. By moving the mask slider (with the option key pressed) until skin texture isn’t being affected, you are essentially applying the sharpening only to the areas where you want it. I tend to apply the mask in the 80-100 range, which filters out most skin textures.

- Sharpen ‘ This is where things begin to really pop off the screen. You’ve set up your skin to be nice and soft and masked off the areas you don’t want affected. Now drag that sharpening slider to the right. Keep going. A little more. Yup, that’s it. With the masking set to affect such a small area, you can afford to apply a liberal dose of sharpening. I will often have my sharpening set in the 80-110 range. You’ll have to use your judgment, though. If it looks unnatural, back it off a little, or increase the mask a bit more.
- Make the colors pop ‘ Now play with the Vibrance setting to really make the eye color pop. You can also use the selective saturation controls and select a color from the eye. I like using Vibrance because it only adjusts colors that aren’t already saturated resulting in a much more natural look.
One of the failings of Lightroom is that you can’t actually see the results of your work unless you are zoomed in, which is probably not how you will eventually be viewing the image. So, there is a little of trial and error involved and may result in you exporting your image a few times. I understand that this will be rectified in Adobe Lightroom 3 (now in beta). In the end, with a well exposed, correctly focused picture, this recipe should get you some pretty decent eyes without having to have 15 different layers set up in Photoshop.
That’s all for now. Let me know if there is a topic you would like me to write about in the future!
