Weirs Beach at Sunrise
This past August, my wife and I found out that we were expecting. Knowing that our vacation time would be limited for the next, oh, 18 years or so, we decided to take an impromptu vacation around labor day up to Weirs Beach in Laconia, NH. We rented ourselves a nice cabin with a beautiful view of Lake Winnipesaukee and went up there for a brief vacation on Labor Day.
The town was dead. Very few businesses in the very small town were open, and there was hardly a soul around. This was perfect for us since we hate crowds and all we wanted to do was spend some nice time together, go hiking, and generally just relax. I, of course, brought my camera everywhere we went.
One evening, while my wife was taking a nap, I went out to get some sunset shots at the marina right by our cabin. I spent a good hour or so waiting for the light to “happen”, but came back with nothing great. The lake is to the east, and the clouds weren’t crazy enough to provide an interesting sky in the east. So, the next morning, I decided I would get up at the crack of dawn – before first light, if possible – to get some sunrise shots of the marina. In my limited experience photographing sunrises, I’ve found that the light is far better than sunset light.
Something like 5AM came, I begrudgingly rolled out of bed, put on some warm clothes, grabbed my camera, tripod, filters, and remote trigger and walked down the hill to the lake. It was, unfortunately, well past first light, but the light was still beautiful. Since I had been there the night before, I had some ideas for compositions already, so I got to work.
I had decided on using my Sigma 17-70 lens since I knew I would want to take shots from a variety of focal lengths. I love my Sigma 10-20, but it’s not very easy to adapt to changing conditions and ideas since even 20mm on a crop camera is only 32mm, which doesn’t get you very close. It was pretty dim light, but the sky was still significantly brighter than the docks and water, so I put on a 2 stop graduated neutral density filter to bring the exposure of the sky down. Without it, I’d either have a shadowy foreground with little detail and a lot of noise, or I’d have a blown out sky. The color in the sky was a beautiful pastel color and I wanted to make sure I captured that. I didn’t have my gray card with me to custom white balance, but I was wearing a gray sweatshirt, so I turned the camera around and set a custom white balance using my sweatshirt. (Note to self, purchase an 18% gray t-shirt and sweatshirt).
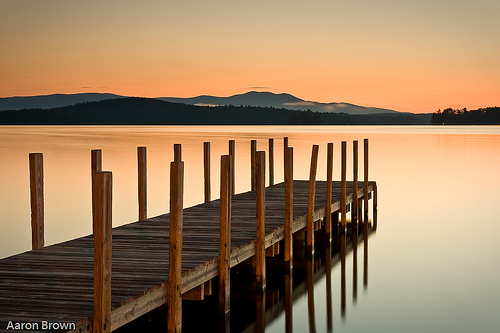
I knew I wanted to get some long exposure shots in order to blur the water to a glass-like surface with frosty reflections of the dock, and I also wanted everything in clear focus. So, I chose f/11, ISO 100, and tried a 25 second exposure. I find that the light meter only gets me in the ballpark on shots like this, so there is a bit of guesswork involved to get the ‘correct’ exposure. I wanted to use the dock to lead the eye out into the lake, mountains, and those beautiful cloud wisps beyond, so I started the dock in the lower left corner, and brought it out to the middle of the image. I adjusted my height so that the sky took up a third of the image, and the water took up 2/3rds. The dock occupies 2/3rds as well. By now, you should be getting the fact that I like utilizing the rule of thirds to help compose my images. Centered images are boring (usually) and offsetting the subject matter does a great deal to bring interest to a photograph.
 I set up my tripod (yeah, I know Ken Rockwell doesn’t like tripods – I’d like to ask him how to get shots like this without one), set the mirror lockup mode on, and took the shot using the settings above, and it came out just as I wanted. My histogram looked as you see here. Nothing was blown out, but it was nicely exposed all the way to the right, just as I wanted. The first thing I noticed was the incredible pastel yellow throughout the image. I loved it! The color actually came from some blue fibers that were woven into my “gray” sweatshirt that I had white balanced to.
[tangent]
The basic idea of exposing to the right, minus all the technical jargon is that you want to expose your shot so that it is as bright as possible without clipping off the highlights. Most cameras that show a histogram will flash clipped highlight areas when you display the histogram. The basic reason for this is that half of all the information the camera captures is in the brightest one stop of exposure. Conversely, the least amount of information is stored in the shadows. So, to get a noise-free image, expose it as far “to the right” as possible (without clipping) because you can always darken it in post processing, but recovering detail from the shadows is all but impossible.
[/tangent]
I moved around quickly as the sun was coming up fast – once the sun breaks the horizon, the game is over. The light is spoiled and it’s back to bed. I got 3 ‘keepers’ from the few dozen that I shot over a period of 30 minutes or so. It just so happens that they were the first 3 shots that I took! I find that happens frequently – my best images are often the ones that seem most intuitive. After I’ve gotten the shots that seem right and natural to me, I start looking too hard for other images to take and end up getting into analysis paralysis to some degree. This is especially prevalent with sunrise and sunset shots, as the light is constantly changing and you never know what is around the next temporal corner.
The sun came up, and I went back to the cabin, knowing I had a few keepers. I didn’t have my computer with me, so it would be another few days before I could download them. So, I did what any sane person who got up at 5AM on vacation would do…I went back to bed.
The final version of the first photograph I took that morning is the first image in this post and is the one I will be talking about further.
When I got back home a few days later, I downloaded the images. To the right is what came out of my camera. As you can see, the dock is a little darker than in the final image, the horizon is a bit crooked, and there is a beer can on the dock that I didn’t notice at the time, but other than that, there was very little editing required. I always try to do my best to get the shot as close to the way I want it in the camera since editing is not something I generally enjoy. I brought the RAW image into Adobe Lightroom and went to work. First, I  straightened the image with the straight edige tool resulting in a -1.14 rotation. Try as I might, I can never get my horizons straight when I’m on the scene. I think I need to get a bubble level for my hotshoe. Then, I added +25 Fill Light, to bring up the brightness of the dock and mountains without adjusting the midrange and highlight tones, added +43 contrast, +43 clarity (to bring out some texture in the wood), and +17 Vibrance. I added a slight vignette to the image and did a tiny amount of sharpening, also in Lightroom. Because the beer can was so small and unobtrusive, I was able to avoid going into Photoshop, and I just used the dust removal tool in Lightroom to edit it out.
Hopefully, this gives you some idea of the how and why of creating this image. Questions? Ask in the comments section!